Showing posts with label 16 days of creating. Show all posts

Tuesday, November 1, 2011

Day 16: 16 Days of Creating - The End!

Yeah! It is Day 16 of my 16 Days of Creating series...nevermind that I'm actually a day late! I thought for the last day I would share some of the things I made for Halloween.

One of my FAVORITE drinks, Swamp Water - so tasty! (Printable wine bottle label found here.)


Witches Fingers - Got this mold on sale at JoAnn's - we even got to "paint" the fingernails!


And some Polyjuice Potion, Acromantula Venom & Phoenix Tears (Root Beer!) for the kids. Printable labels also from Fantasy Jr.)


Of course it wouldn't be Halloween if we didn't dress up our dog!


Last but not least, this year's pumpkins (cell phone picture alert - not the greatest quality!)

First we have "I Ate Too Much Pumpkin Pie" (and apparently drank too much root beer! Harry threw that in, funny funny.)


And Ginny's interpretation of "Mike Lebowski" from Monsters, Inc.


So that's it for my 16 Days. Whew! I do have a few new projects in progress, but I think I'll slow down a little for now! Come back soon to see what's new!


Friday, October 28, 2011

Day 15: 16 Days of Creating - Going Batty!

Yep, it's a Friday two-fer! Here's part two for today...it's quick and easy. (The best kind of craft in my book!) I was inspired by one of my favorite blogs, Thrifty Decor Chick, to add a little Halloween spirit to my lampshades. This is SUCH a cute idea! 


All you need to do is...

PRINT:

I really dig the Mickey Mouse ears!

CUT:

(HINT: Pick something with not TOO many curves!)

TAPE:


Day 14: 16 Days of Creating - Halloween Printable

Once again, I'm a little behind on my 16 days! Today might just be another two-for-one! Here is the first installment...

I really like all the cute Halloween printables that are out there right now. I've always thought they looked easy to do, so....I tried my hand at some "subway art" (BTW, does anyone know where that name came from? Just curious!).


Here it is - drum roll, please!


Now, I have no idea what will happen if and when you try to print this out. I hope it works, but unfortunately I'm not that tech-y. So give it a try...let me know what you think!

Wednesday, October 26, 2011

Day 13: 16 Days of Creating - Recipe Binder

I really don't feel like today's feature is very creative...But it is something I desperately needed to do. So we'll just call it..."creative organizing!" 


I used to have a shelf in my kitchen full of this:


Pages and pages of recipes I printed off the internet or copied from a friend. This picture was even taken AFTER I sorted through and got rid of the ones with a 52-item ingredient list that I was delusional enough to think I'd make "someday"!

I also have a binder that was maybe 1/4 full of recipes from my now-nonexistent "Freezer Club." Freezer Club was fun while it lasted - we would meet about once a month and swap meals that everyone made up ahead of time. Each participant went home with anywhere from 6-12 meals to put away in their freezer. The rest of the night we sat around and talked, ate, drank and had fun! But sadly, Freezer Club is no more...so I changed the label on my binder to say "Freezer Meals & More" (so catchy, AND accurate!)


Then I three-hole punched everything and made a few divider pages:


I have to say, it was a BIG relief to get my things a little more organized. Whew!

Tuesday, October 25, 2011

Day 12: 16 Days of Creating - Halloween Greetings

Here are a few simple Halloween greeting cards I made today. Spoiler alert: Mom & Sisters - don't read this post if you want to be surprised when you open your mailbox in a few days! :)


Day 10 & 11: 16 Days of Creating - Two For One!

Welcome back! Today I'm offering a special deal - two posts for the price of one. So exciting! (In other words - I didn't get it done on Friday!)

The first thing I worked on over the weekend was a little fall display for my dining room. If you live in Iowa and have any Cub Scouts or Boy Scouts in your house, you know all about this:


Yes, it is popcorn time. The Boy Scouts sell popcorn in these beautiful decorative tins for  their major fundraiser. Which means my garage is full of the stuff. My son is trying to sell these to friends, neighbors, family, anyone on the face of the earth. However, he can't get rid of it fast enough, and some people in our house have no self-control. So we end up eating half the inventory and have something like 25 empty popcorn tins sitting around the house. I decided there MUST be something creative I could do with them!

So...I wrapped a tin up in some brown craft paper, tied some raffia around it (I'll change this when its closer to Christmas time to something a little more festive!) and filled it with some dogwood branches from my yard. I also picked up some gold sparkly twiggy things to put with them. (Yes, that is the real name. Check Hobby Lobby and they have a special section marked "Sparkly Twiggy Things" - it's in the back by the flowers.) Anyway, the final touch was a small string of white lights in the bottom so I can light up my display at night!


I usually do some version of this in the winter time and make it more Christmas-y. I love the bright red branches.

The next project I did has been in the works for a while. It is a decoupaged pumpkin that I started about a month ago, and it didn't quite work out the way I envisioned. So it had been sitting on my craft table, mocking me every time I walked by. Imagine my excitement when I got an email from a woman at church who was organizing a "pumpkin decoupage party" last Sunday! I was only able to go for about an hour, but I had plenty of time to whip up this:


(By the way, I've discovered Piknik - who knew that taking pictures with a digital camera and making them look like they were taken in 1968 would be cool someday??!!)


Of course I had to do a cheesy 1980's "misty" version...love it!

And I promise think that I'll get caught up later today with Day 12...stay tuned!


Thursday, October 20, 2011

Day 9: 16 Days of Creating - Jewelry Junkie

So…another day, another late post. Once again, I’m thinking I was a little overly-ambitious with the 16 Days of Crafting. There are so many ideas floating around in my head, but none of them are real-life projects at this point. AND today was one of “those” days. More about that later.

There are no pictures for today’s post – mostly because I've figured out that jewelry is very difficult impossible to photograph. Wouldn't you think that a squirmy 2-year-old would be a photographer’s biggest challenge? Uh, nope, sorry – try a small, shiny inanimate object sometime. Just for fun, and see what happens. Okay, okay - enough complaining! On with it...

I have been making jewelry for several years - it kind of took over after the cross-stitching fad ended (stop laughing, you probably did it too!). I have made everything from earrings to wine glass charms. I love looking for unique beads, and have quite the stash on hand. This comes in handy on a weekend when I'm going out and need something to match an outfit. (Wish that happened a little more often, but hey. I guess that's what I get for being 39...ish.)

One thing I LOVE to do is go through the Lia Sophia or Silpada catalog for new ideas. (At lease those people know how to take pictures!) So watch out if you're having a home party - I'll come for the catalog & food, then go home to make my own goodies! :) Just kidding!

I once tried selling my jewelry on eBay, and that didn't work out too well. I was competing with something like 5 million other home-jewelry makers. So far, I haven't tried Esty, but it is on my "to do" list...someday! Other than that, I have made quite a few things for church fundraisers/silent auctions and for gifts to lucky family members who either love it, or are very good actors. :)

Mainly I enjoy adding to my bead stash, coming up with new ideas, and just having fun with it!

Wednesday, October 19, 2011

Day 8: 16 Days of Creating - Dresser Makeover

It was bound to happen, I knew it! Today I'm posting about a project I did several years ago, but I do have two good reasons:


ONE: When I started the 16 Days of Creating, I knew it would be tough. Mostly due to the time factor (Since my in-progress projects have almost run out, it's HARD to find time to make something EVERY DAY!) Also, I feel like in order for it to be blog-worthy, it should be somewhat cool, not just "Hey, look at this doodle of my dog that I drew today!"


TWO: The dresser featured today (see below) is horribly out of style and I really need some inspiration!


So here's the history...This dresser has been around for a while. It was just a plain dresser, stained a dark brown color when my mom gave it to us MANY years ago. I didn't do anything to it for about 3 years. But when I saw a magazine article (Better Homes & Gardens, I think!) with this DIY dresser project, I knew I wanted to try it. It was pretty simple, and...not to be braggy...I did get a lot of compliments on it. It looked good with the decor in our master bedroom. In the house we no longer live in. But now I'm kind of over the mauve-y floral theme. And the brass handles. Anyway...


I always feel like we don't "need" new furniture for the bedroom since it's a room that not everyone sees. Also, we just bought some new things for my daughter's room and the family room. So replacing it isn't happening anytime soon. But it's really out of place in my room and something needs to be done. The new colors in my bedroom are more like this:


Not my actual room - I didn't have time to clean up for a whole bedroom photo shoot!


Now, imagine that brown wall and greeny-blue comforter with the bright pink floral dresser. Regular readers (Mom & Sisters) you don't have to imagine! You know how hideous it is! So that's my dilemma...what would you do?


Tuesday, October 18, 2011

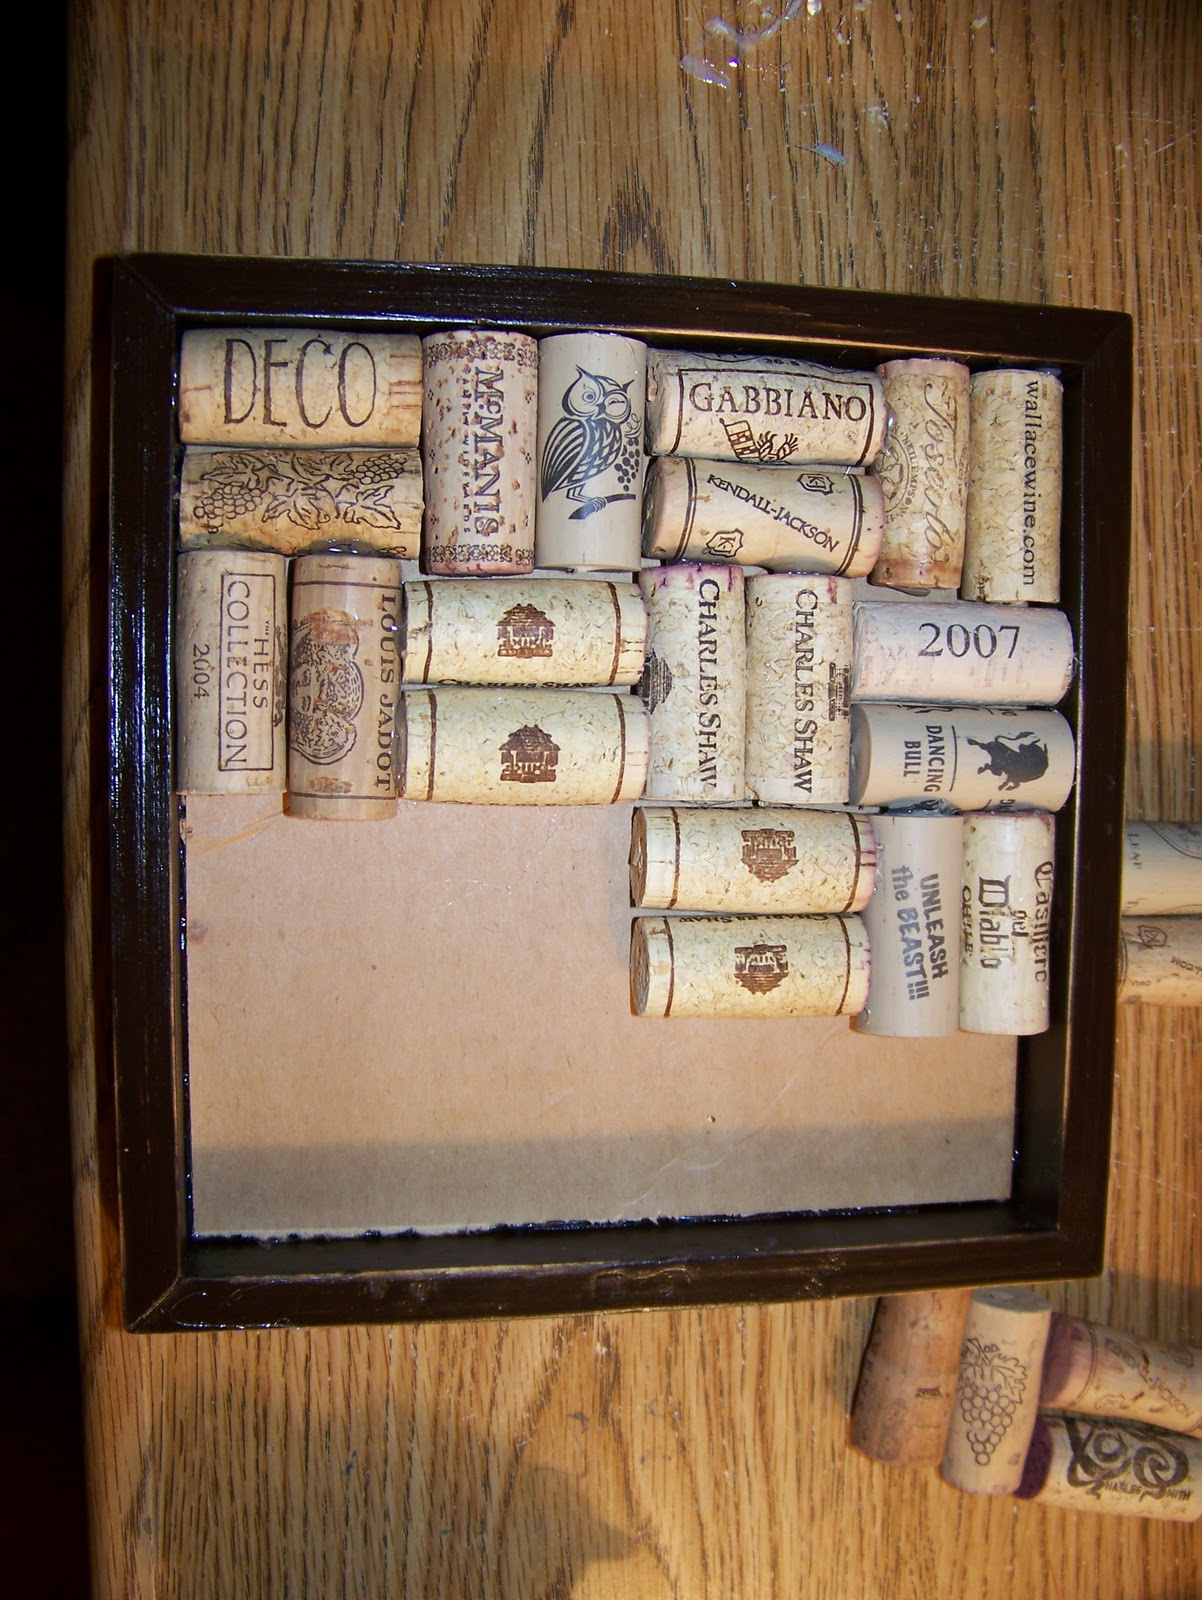
Day 7: 16 Days of Creating - Wine Cork Trivet

Whew! I wasn't sure I'd get this one in today. Just finishing up this post with less than an hour till midnight! This project is by far the BEST out of the 16 Days. Why? Because the #1 requirement for this one is to drink wine! Heehee. The NEXT best thing about this project is that it took me to Goodwill, where I stumbled upon this:


I went in looking for an inexpensive frame that I could dismantle and use for my trivet. I planned on spending $2 or less, and getting out of there quick. Because it kind of smells in that place. Anyway. On my way to the frames, I passed the furniture area, where I first met and fell in love with my beautiful bench! ;) I'm sure I can turn it into something even more wonderful with a little work. Right now it is sitting on my front porch, just waiting. Sigh.


Oops, I apologize for getting sidetracked...back to the trivet!

Supplies for this one are easy - a picture frame (preferably a square), hot glue, paint, acrylic spray, and of course, LOTS and LOTS of wine bottle corks!

(The paint, sandpaper, and spray are totally optional) 
First I sanded the frame a little to smooth it down, then painted it with some "Espresso Bean" acrylic paint. (I had originally planned on black, but the espresso just jumped out at me!)


After letting the paint dry, I sanded the edges for a bit of a "worn" look:


Next I sprayed the frame with a glossy acrylic spray to add some shine:


Time to break out the hot glue gun!  I glued a piece of cardboard to the back of the frame:


And then the fun part...gluing down the corks.


About 7 hot glue sticks later...


I made a special section in the middle for Charles Shaw. (Love that 3-buck-Chuck!)


Monday, October 17, 2011

Day 6: 16 Days of Creating - Pumpkin Muffins?

I have to admit, I'm kind of taking the easy way out again today. We were out of town for a funeral, then came back home and had weekend visitors. Just not a lot of creative time around here lately! But I promise, this recipe is another goodie! I saw this on Pinterest, and because of the previously mentioned busy weekend, I thought I'd make something SUPER easy for our football tailgate, and I wasn't disappointed. I'm not sure if they should be called muffins or cupcakes...but anyway, here is a picture-tutorial-recipe, they are so easy!

INGREDIENTS: CAKE MIX, PUMPKIN PIE FILLING, MUFFIN LINERS
MIX TOGETHER CAKE MIX & PIE FILLING
BATTER WILL BE THICK
SPOON BATTER INTO MUFFIN CUPS AND BAKE AT 350 FOR 20-25 MINUTES
TA-DA! THEY ARE SO GOOD THAT I DIDN'T EVEN GET A PICTURE BEFORE SOME OF THEM GOT SNATCHED UP!

Friday, October 14, 2011

Day 5: 16 Days of Creating - Cheesy Potato Soup

Although it is officially fall, it really doesn't feel like it here in Iowa. I was soooo tempted last weekend to turn the A/C back on, but we toughed it out. This week isn't as hot (I don't think we've hit 85 yet!) But since we're about halfway into October, it just SEEMS like it should be much colder. Our family is definitely ready for some soup & chili meals. Here is a recipe for one of my favorites. I'm pretty sure it will make an appearance at our house next week!


CHEESY POTATO SOUP


1 stick butter or margarine
1 chopped onion
1/2 cup diced celery
1 cup grated carrots
3 cups chicken broth
1 bag cubed hash browns, frozen
2 cups milk
1/2 pound Velveeta "cheese", cubed
1 tsp parsley flakes (optional)
Bacon Bits (optional)


Cook celery, carrots & onion in butter on stovetop until tender. Add chicken broth and hash browns. Cook until thickened. Add milk and Velveeta. Stir until melted. Garnish with parsley or bacon bits.


We like to have this with some yummy homemade bread fresh from the oven. (LOL! We like to, but it rarely happens.) :) 


Try this recipe for yourself - you won't be disappointed!


Thursday, October 13, 2011

Day 4: 16 Days of Creating - Sparkle Pumpkins

I was very excited to try this project - based on something I saw at the What Cheer Flea Market a while back. It involves all my favorite tools - Mod Podge, hot glue & glitter! It's so easy I doubt if instructions are necessary, but just in case...


STEP 1:

Gather materials: Small pumpkins and/or gourds, spray paint, Mod Podge & foam brush, glitter. You'll also want to spread out some newspaper or do the painting outdoors.


I also added some artificial leaves...


STEP 2:

Apply spray paint


STEP 3:
After paint dries, apply Mod Podge to the top of the pumpkin and leaves, and sprinkle with glitter.


 STEP 4:

When everything is dry, hot-glue the leaves to the pumpkins. How easy was that??


Oh, and aren't those tree branch candle sticks great?? I wish I could take credit for those, but they were centerpieces at a wedding we attended a few years ago, and we got to take them home as "party favors". They are always part of my fall decorating in one way or another!